How To Create Aws Vpc-Vpc Tutorial Step By Step
How To Create Aws Vpc- AWS Vpc Tutorial
In the following steps i will show you how to create aws vpc with 2 public subnets and 2 private subnets step by step. go to aws console and go to vpc, click on create vpc now you can see like below image.
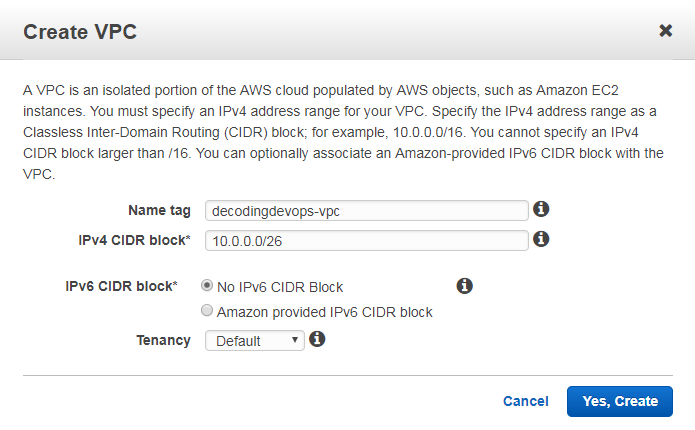
Enter name tag, name tag is nothing but vpc name. here my vpc name is decodingdevops-vpc and enter ipv4 cidr block value and click on yes create.
ipv4 cidr block
ipv4 cidr block here we will mention our cidr range. cidr range nothing but ip ranges of your resources. cidr range will tell you how many ips are available in your vpc. here my cidr range is 10.0.0.0/26.
so number of ips available is 2^32-26=2^6=64 ips available
First ip is 10.0.0.0
Last ip is 10.0.0.63
if your cidr range is xx.xx.xx.xx/y
then number of ips available is 2^32-y
Public SubNets
public-a
Go to subnet and click on create subnet give name tag as public-a
Select your vpc here my vpc name is decodingdevops-vpc
click on vpc scroll button you can see your vpc's select you vpc, after selecting it will show vpc id not vpc name.
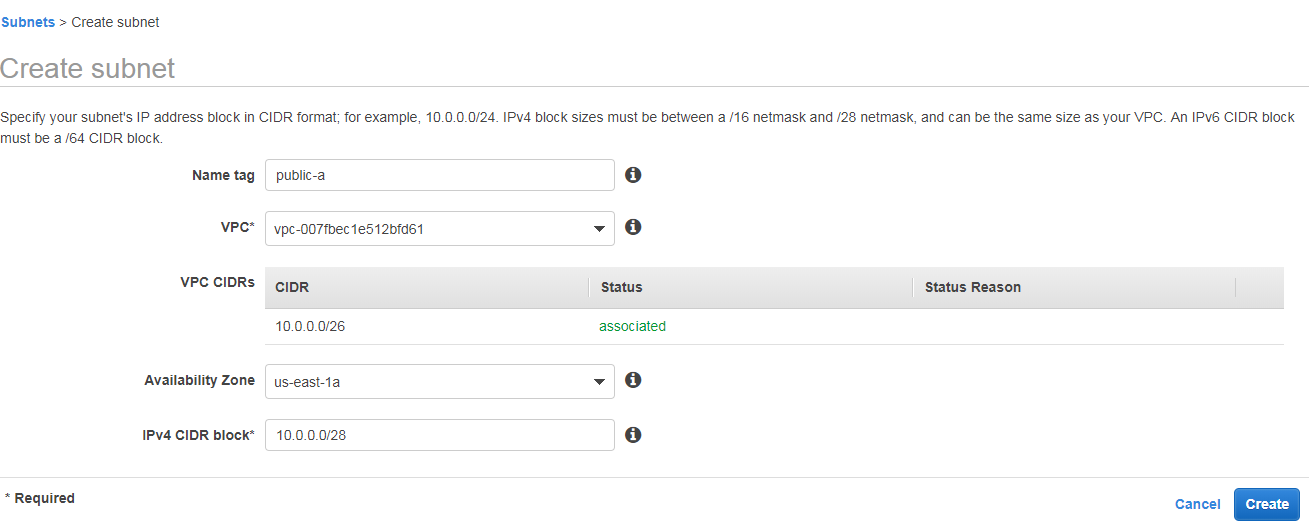
Here my vpc id is vpc-007fbec1e512bfd61
Select Availability Zone us-east-1a
IPv4 CIDR block 10.0.0.0/28 2^32-28 =2^4 =16 ips are available in this subnet
The ip range in this subent is 10.0.0.0/28 to 10.0.0.15/28
in every subnet 5 ips are reserevd for aws internel use those are first 4 and last 1
So you can use remaining ips, when you are launching ec2 instances or rds in this subnet that instances will get ip address in between 10.0.0.4/28 to 10.0.0.14/28
Public-b-How To Create Aws Vpc
Same like public-a create new subnet give name tag as public-b, select same vpc.
Select Availability Zone us-east-1b
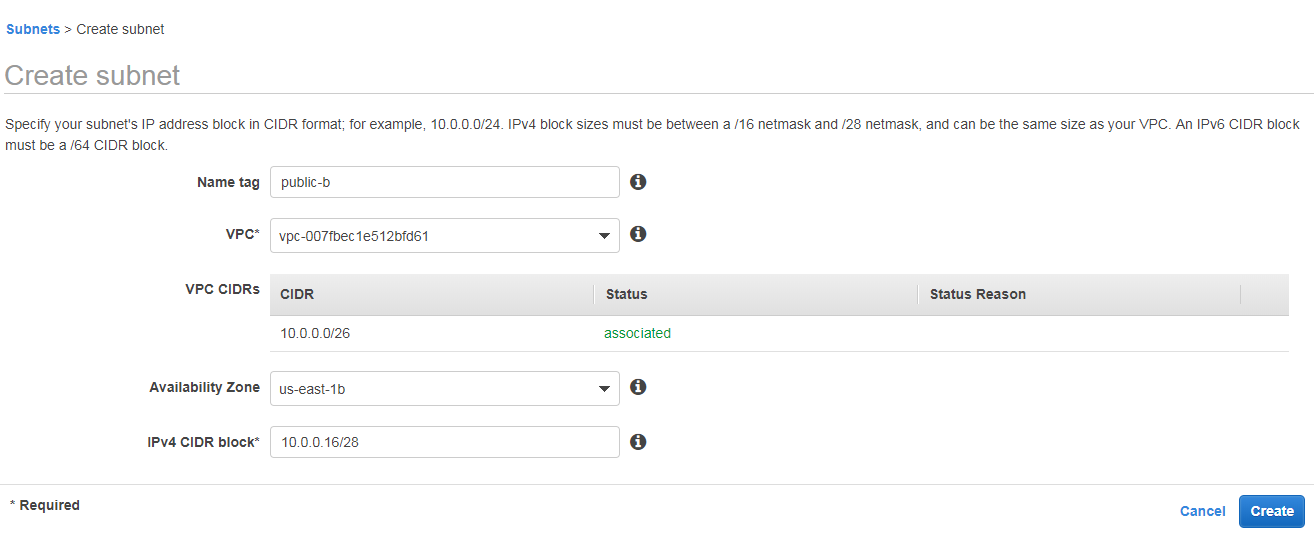
IPv4 CIDR block 10.0.0.16/28 2^32-28 =2^4 =16 ips are available in this subnet
The ip range in this subent is 10.0.0.16/28 to 10.0.0.31/28
In this subnet also 5 ips are resevd for aws internel use those are first 4 last 1
So remaining ips you can use, when you are launching ec2 instances or rds in this subnet that instances will get ip address in between 10.0.0.20/28 to 10.0.0.30/28
Private SubNets
Private-c
Same like public-b, create new subnet give name tag as public-c, select same vpc
Select Availability Zone us-east-1c
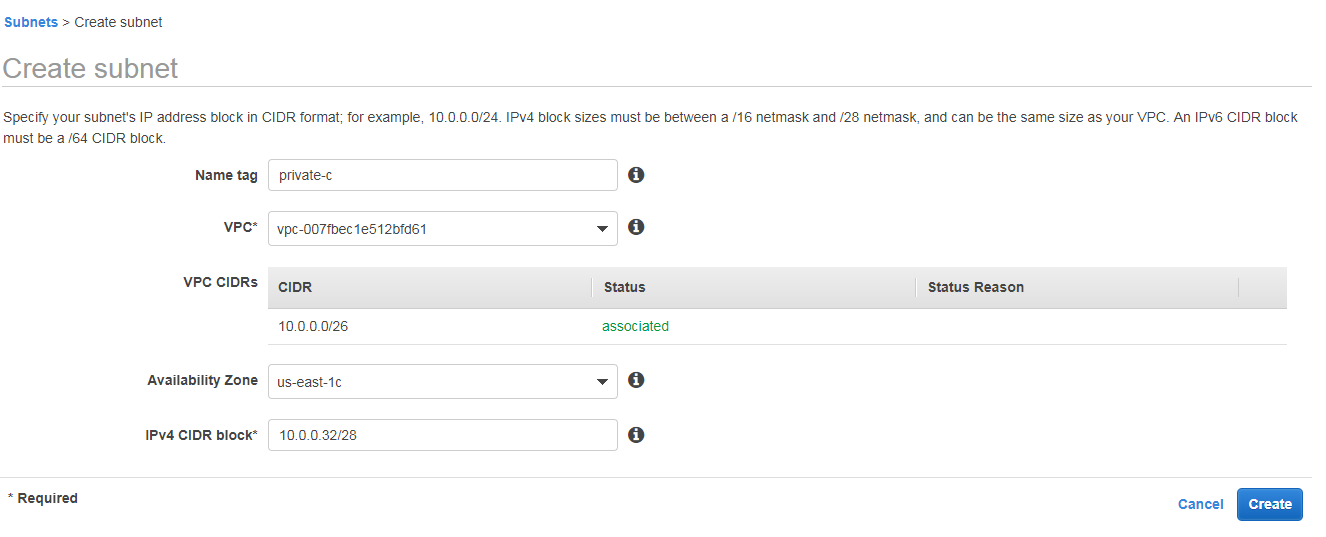
IPv4 CIDR block 10.0.0.32/28 2^32-28 =2^4 =16 ips are available in this subnet
The ip range in this subent is 10.0.0.32/28 to 10.0.0.47/28
In this subnet also 5 ips are resevd for aws internel use those are first 4 last 1
So remaining ips you can use, when you are launching ec2 instances or rds in this subnet that instances will get ip address in between 10.0.0.36/28 to 10.0.0.46/28
Private-d-How To Create Aws Vpc
Same like public-c, create new subnet give name tag as public-d, select same vpc
Select Availability Zone us-east-1d
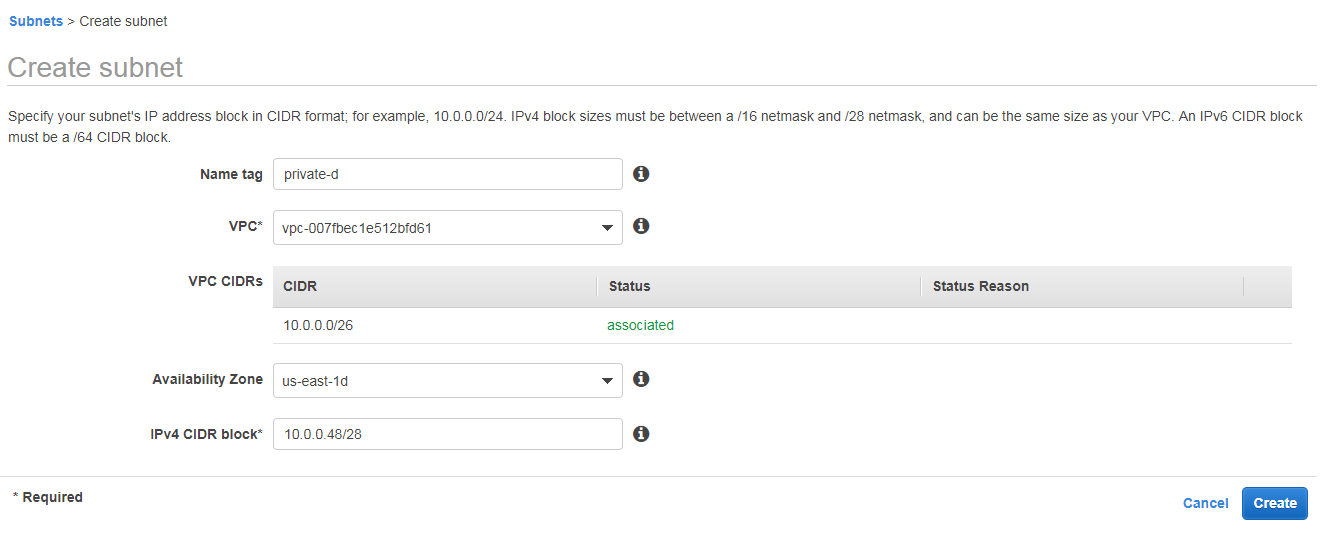
IPv4 CIDR block 10.0.0.48/28 2^32-28 =2^4 =16 ips are available in this subnet
The ip range in this subent is 10.0.0.48/28 to 10.0.0.64/28
In this subnet also 5 ips are resevd for aws internel use those are first 4 last 1
So remaining ips you can use, when you are launching ec2 instances or rds in this subnet that instances will get ip address in between 10.0.0.52/28 to 10.0.0.63/28
Creating internet gateway
Click on internet gateways and click on Create internet gateway it will ask you name tag enter nay name here iam giving devops-itg and click on create

attach internetgateway to vpc
Click on actions and click on attach to vpc
 Select your vpc here my vpc is decodingdevops-vpc and click on attach
Now your internet gate way is attached to your vpc
Creating NAT Gateway
Go to nat gateways to click on create nat gate way it will ask you to choose subnet
We will launch our nat gateway in public subnet only not in private subnet
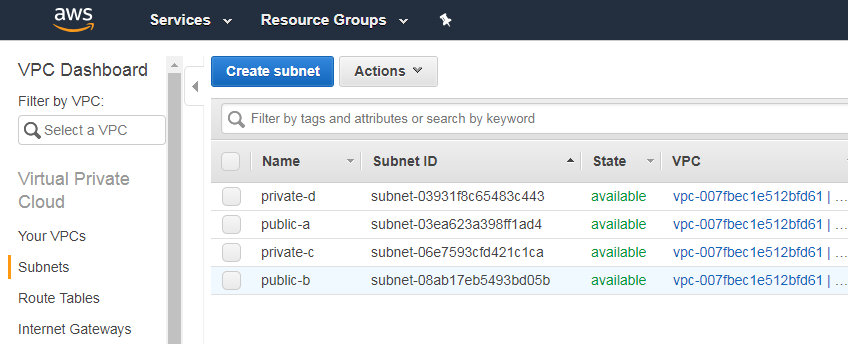
So select public subnet id here iam choosing subnet-03ea623a398ff1ad4 this is my public-a subnet

Now it will ask you to attach elastic ip here you can click on create new EIP and create
And click on create nat gate way. Now we have created natgate way
Creating Route Tables
Public Route Table
When you are creating new vpc automatically you will get a default route table.
It has no name make it as public-rt

And click on Subnet Associations
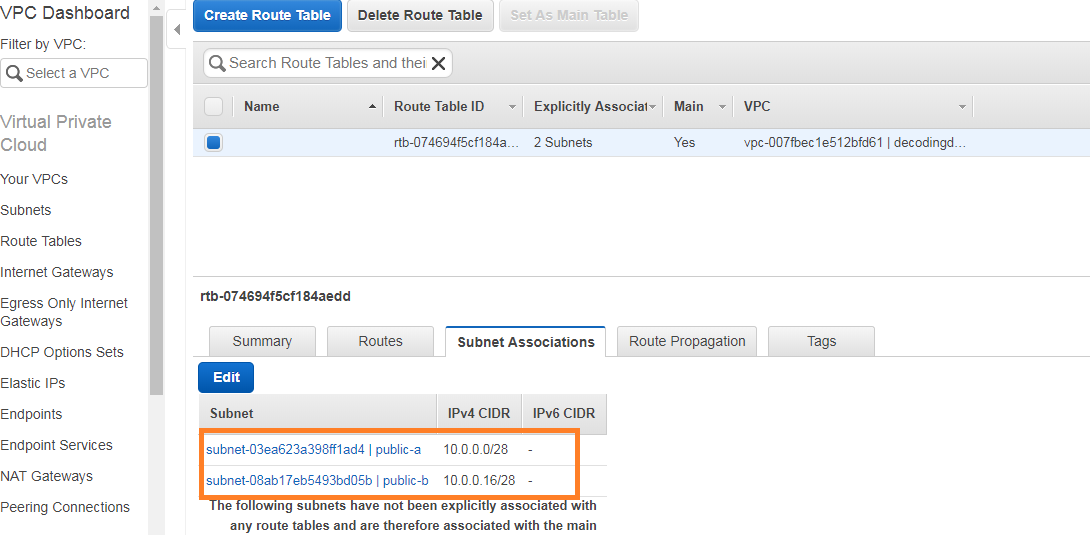
Click on edit and select your two public subnets and save
Here iam choosing public-a and public-b
Now click on routes and edit click on add another rule
In destination write 0.0.0.0/0 in target select internetgatewayid
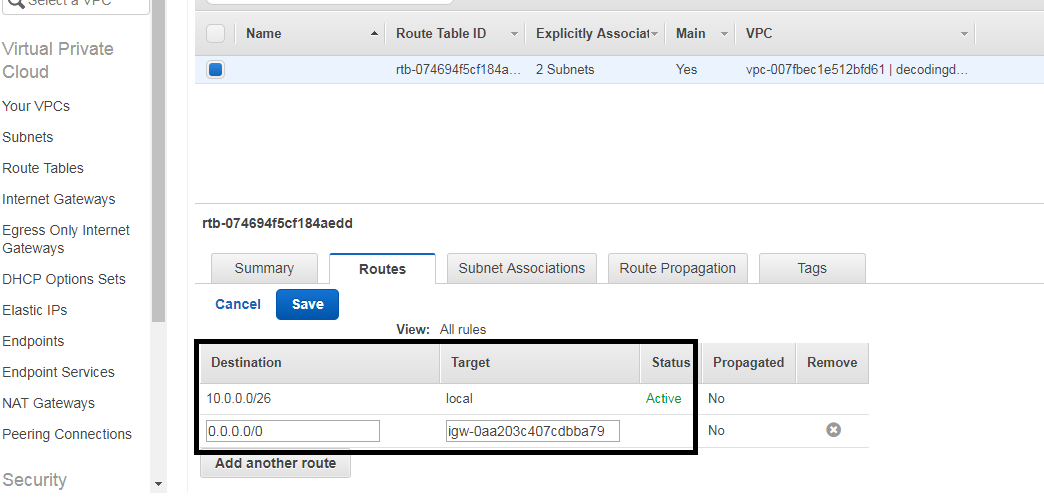
Destination Target
0.0.0.0/0 internetgateway-id
Now we have a public route table
Private Route Table
Now we have to create another route table so click on create route table
It will ask you name tag enter private-rt and click on yes create
Now we have created private route table
And click on Subnet Associations
Click on edit and select your two private subnets and save
Here iam choosing private-c and private-d
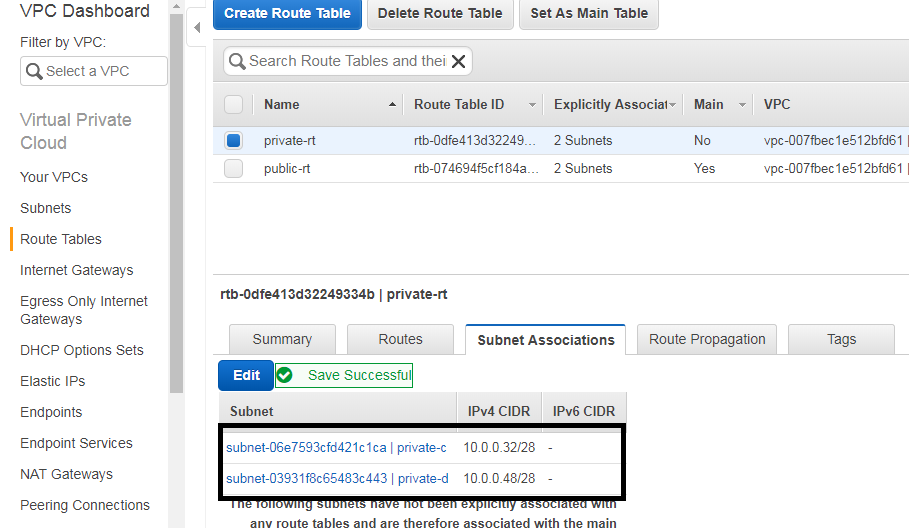
Now click on routes and edit click on add another rule
In destination write 0.0.0.0/0 in target select natgatewayid
Destination Target
0.0.0.0/0 natgateway-id
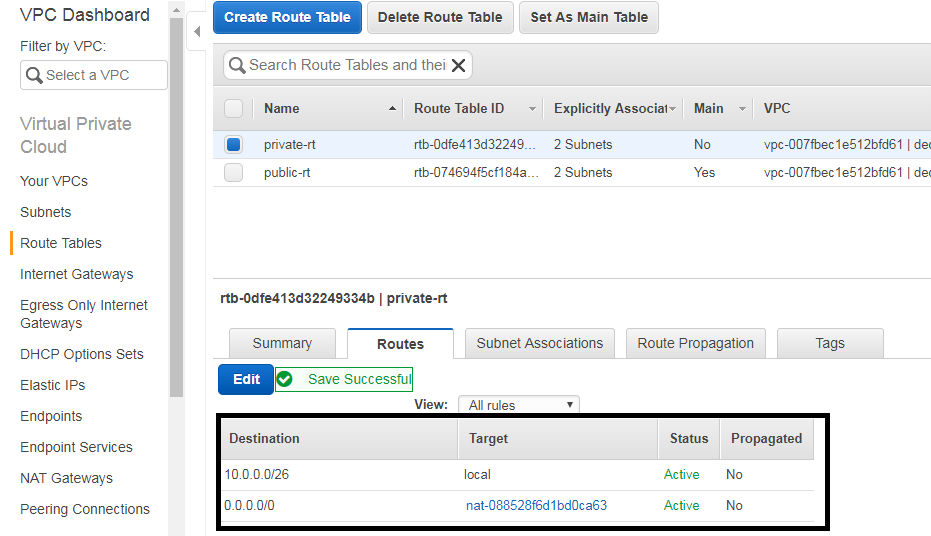
now we have successfully creted vpc with two public subnets and two private subnets.
now select your vpc and click on actions
here you can see EDIT DNS RESOLUTION click on this make it yes
and in same the way there is a another option EDIT DNS HOSTNAMES click on this and make it yes
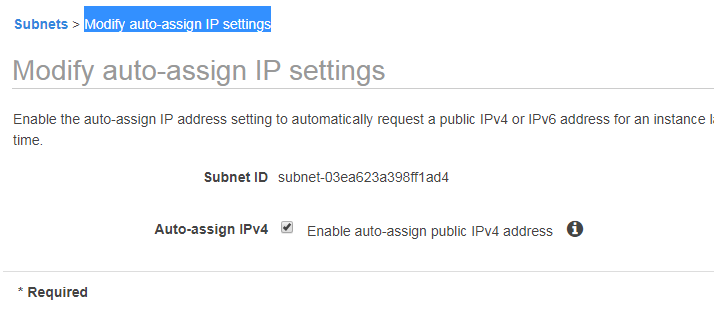
go to subnets and select public-a subnet click on actions and click on Modify auto-assign IP settings and Enable auto-assign public IPv4 address and save it.
same like above select subnet public-b and Enable auto-assign public IPv4 address and save it.
IMP POINTS;
- create vpc with cidr
- create 4 subnets name two subnets as public and remaining as private.
- create one internet gateway attach it to vpc.
- create Nat gate way in any public subent and attach one elastic ip to it.
- create two route tables name one as public-rt and remaining one as private-rt
- in public-rt in subnet associations add those public subents and
- in routes
Destination Target
0.0.0.0/0 internet gateway-id
- in private-rt in subnet associations add those private subnets and
in routes
Destination Target
0.0.0.0/0 natgateway-id
- select your vpc and click on actions make EDIT DNS RESOLUTION yes
- select vpc and click on actions make EDIT DNS HOSTNAMES yes
- select your one public subnet click on actions Enable auto-assign public IPv4 address
- select other public subnet click on actions Enable auto-assign public IPv4 address
now we have successfully configured vpc in aws.
now you can launch your servers or ec2 instances in this vpc.
