What is AWS Internet Gateway and How to Create it?-DecodingDevOps
What is AWS Internet Gateway and How to Create it?-DecodingDevOps
AWS Internet Gateway
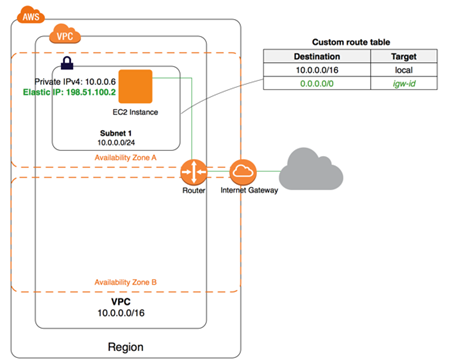
An Internet Gateway is a VPC component that is a highly available component that allows the instance in the VPC to communicate to the internet.
Two purposes of Internet Gateway:
- Provides a target to route internet routable traffic
- Performs NAT translation
It supports IPv4 and IPv6 traffic.
You can create only one Internet Gateway per VPC.
How To Create Internet Gateway
- Create an Internet Gateway
- Attach it to VPC
- Add route in your subnet’s route table to point to the internet
- Your instance must need a publicly routable IP
- Make sure that your NACLs and SGs allows the traffic to the internet

In order to route the internet routable traffic to the internet you must create a route in the route table to point 0.0.0.0/0 to the IGW (allows IPv4 traffic) and ::/0 to point to the IGW (allows IPv6 traffic).
For routing Internet traffic from the instance which doesn’t have public IP, you can use NAT gateway.
Steps to Create VPC with Internet Gateway
Checklist:
- Create a subnet
- Create an Internet Gateway
- Attaching Internet Gateway to VPC
- Creating a custom route table
- Creating a Security Group
- Adding Elastic IP
Creating a subnet
- Open VPC console
- In the navigation pane, Go to Subnets
- Choose Create Subnet
- Specify VPC, AZ, CIDR Range, For IPv6 choose a custom range
- Select Yes, Create
Creating Internet Gateway
- Open VPC Console
- In the navigation pane, Go to Internet Gateway
- Choose Internet Gateway
- Specify IGW name
- Choose Create
Attach IGW to VPC
- Select the IGW and Choose on Action
- Choose Attach to VPC
- Select the VPC, choose Attach
Creating a custom route table
-
- Open VPC console
- In navigation pane, Choose Route Table
- Choose Create Route Table
- Specifty Name and VPC
- Choose Yes, Create
- Select Route table you just created, select the Route tab -> Edit -> Add Another Rule. Add 2 rules as below
- 0.0.0.0/0 -> Select IGW you created as the Target
- ::/0 -> Select IGW you created as the Target
- Choose Save
- Subnet Association Tab -> Edit -> Associate -> Select the Subnet -> Choose Save
Creating a Security Group
- Open VPC Console
- In navigation pane, Select Security Groups
- Choose Create Security Group
- Specify Name and VPC
- Choose Yes, Create
- Select Security Group and Choose Inbound Rules
- Choose Edit -> Add Rule -> Choose the Required Traffic
- Choose Save
Now Lets attach this SG to ec2 instance
- In navigation, Choose Instances
- Select the Instance, Choose Action -> Networking -> Change Security Groups to select New SG or Choose Assign Security Group
Adding Elastic IP
- Open VPC Console
- In navigtion pane, Choose Elastic IP
- Choose Allocate Address
- Choose Allocate
- Select the IP, Choose Action -> Associate Address
- Specify Instance/Network Interface
- Choose Associate